This manual covers the main equipment features only. While it also includes the procedure for saving and loading from the now long obsolete memory cards it does not mention the how to operate with the optional floppy drive interface so I am still at a loss about how to use this! Note that there is a separate manual covering the MIDI interface and programming via the keyboard, not included in this download. You will also need to get hold of this if you want to use the MIDI interface properly. Basically there is little difference between this manual and the free to download manual for the similar PR60 model.
Nothing wrong with the manual or the delivery - came to me the same day I ordered it. But afterwards I realized that I ordered the wrong manual. Probably better with the Quick start - version. So maybe it would be better if we could see a list with inhold for each manual before ordering?
Bought T4850 High End Tuner a few years ago, but i didn't know where all the buttons were used for. So i purchased the owners manual. Perfect! Just what i needed.
Text excerpt from page 10 (click to view)
Operation
User Setup
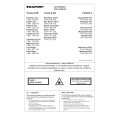
AFS 224 Filter Q's
+3 +2
Music High - 1/80th Octave
AFS 224
+3 +2 +1 -0 -1
Music Med - 1/20th Octave
+1 -0 -1 -2 d B -3 u -4 -5 -6 -7 -8 -9 700 750 820 850 900 .95k 1k Hz 1.2k
-2
Music Low - 1/10th Octave
d -3 B u -4 -5 -6 -7 -8 -9
Speech - 1/5th Octave
Live Filter Lift: Live Filter Lift provides maximum sonic integrity by removing unnecessary feedback filters. This button is used to select the live filter lift times and are indicated as follows: LED Lift Time Not Lit Lift Off Green 10 Seconds Yellow 10 Minutes Red 60 Minutes Mode: This button is used to select FIXED (button is green) or LIVE (button is red). The Mode button is also used to set the number of filters. For more information please see Section B Set Up AFS Filter LEDs: The AFS 224 offers 24 filter LEDs per channel, which are used to indicate the number of fixed and set filters within each channel.
User Setup
This section of the manual is provided to give the user step-by-step instructions for setting up and optimizing the performance of the AFS 224.
A - Setting Gain Structure
The four basic ways to hookup the AFS 224 to your system are as follows: 1) 2) 3) 4) Connected to the insert jack(s) on a microphone channel of a mixer. Connected to the insert jack(s) on the main outputs of a mixer. Connected to the subgroup insert jack(s) of a mixer. Connected inline w/outputs of a mixer (output of mixer to input of 224, output of 224 to amplifiers).
For maximum performance and proper operation, the average input signal should consistently light the 0 dBu LED, with the +10 dBu LED occasionally lighting. Hookup methods 1, 2 & 3 above are the preferred way to connect the AFS 224 since the insert points on most mixers are pre output fader. This allows the proper signal level to be fed to the AFS 224 without the channel or output fader affecting the level as the fader is moved up or down. Be sure to check the mixer�s manual for the nominal operating point for the insert jacks, and then select the +4dBu or -10dBV switch on the back of the AFS 224 accordingly.